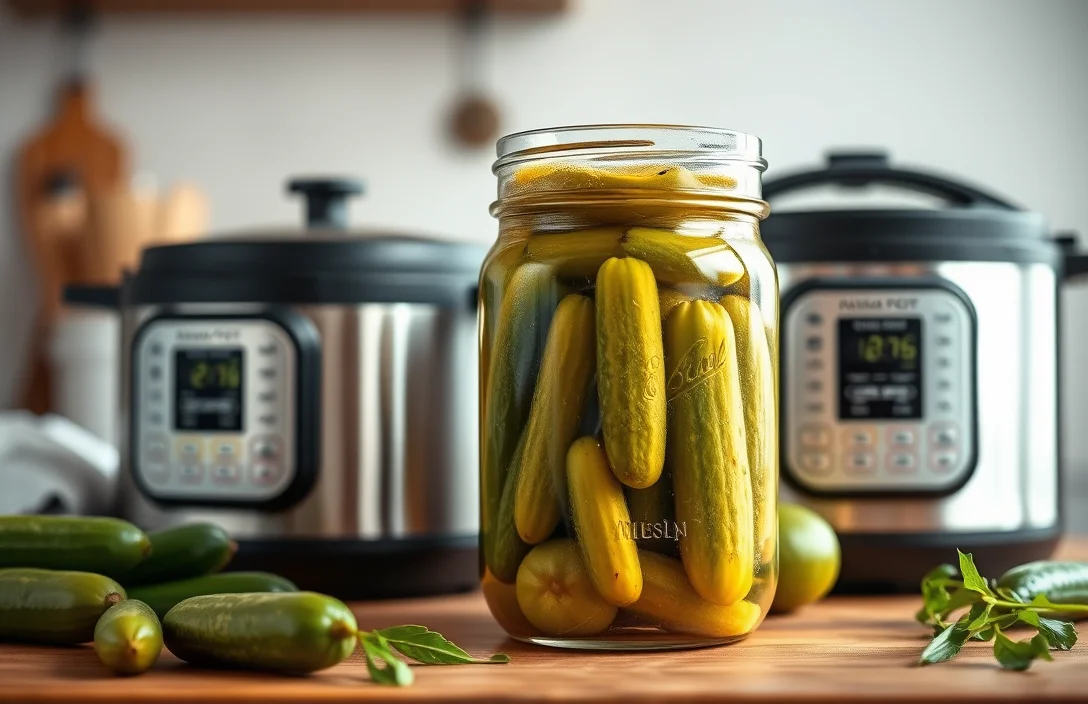
How to Can Pickles Using a Pressure Cooker for Flavorful Results
Statistics show that pressure cooking can reduce canning time by up to 50%, making it an efficient method for preserving pickles. This technique not only saves time but also ensures your pickles retain their crisp texture and vibrant flavor, enhancing your culinary creations.
Canning pickles with a pressure cooker is quick and safe. Key points include temperature control for safety, sterilization of jars, and flavor infusion during the cooking process. Following guidelines ensures delicious results every time.
Choosing the Right Cucumbers
Pickling cucumbers differ from slicing varieties. Select short, firm cucumbers with a bumpy skin, often referred to as “pickling cucumbers.” Common varieties include Kirby and Persian cucumbers, which maintain their shape and crunch during the canning process. Avoid long, smooth cucumbers, as they tend to be watery and may not yield the desired texture.
Prioritize freshness for optimal flavor. Cucumbers should be harvested within a few days of canning for the best results. Inspect each cucumber for blemishes or soft spots, as these indicate spoilage. Sturdy specimens ensure a crisp and flavorful pickle. Local farmers’ markets often provide the freshest options available.
Consider size when selecting cucumbers. Ideally, choose ones that are 4 to 6 inches long. Smaller cucumbers tend to retain a crunchier texture, while larger ones may become mushy during the canning process. Consistent sizing also promotes even pickling, enhancing the overall quality of your canned pickles.
Lastly, handle cucumbers gently. Bruises or cuts can lead to spoilage, affecting the quality of your final product. Rinse them thoroughly under cool water to remove dirt. Keep them in a cool, shaded area until you are ready to begin the canning process. Proper handling ensures a successful canning experience.
Preparing Your Pickling Brine
Creating a flavorful pickling brine is essential for delicious pickles. Begin by combining vinegar, water, and salt in a pot. A common ratio is 1 part vinegar to 1 part water, with 1-2 tablespoons of salt per quart of liquid. Adjust these measurements based on your flavor preference.
- Combine vinegar and water together. Use white vinegar for a sharper taste or apple cider vinegar for a milder flavor. Experiment with different types to find your favorite.
- Add salt to the mixture. Pickling salt is ideal since it dissolves easily and doesn’t contain additives that can cloud the brine.
- Incorporate sugar for sweetness. Depending on your taste, 1-2 tablespoons of sugar can balance the acidity of the vinegar.
- Include spices for enhanced flavor. Common spices include mustard seeds, dill seeds, peppercorns, and garlic. Add about 1-2 teaspoons of each for a robust flavor.
- Bring the mixture to a boil. Stir until the salt and sugar completely dissolve, ensuring an even distribution of flavors.
Allow the brine to cool slightly before using it to fill your jars. Ensure the brine is poured over the cucumbers, fully covering them for effective pickling.
Packing Jars for Pressure Cooking
Packing jars efficiently is crucial. Start by selecting jars that are specifically designed for canning. Ensure each jar is clean and sterilized to prevent contamination. Fill the jars with cucumbers, leaving about half an inch of headspace at the top. This space allows for proper sealing and expansion during the pressure cooking process.
Arrange cucumbers snugly but not tightly. Layering them vertically can maximize space while ensuring even exposure to the pickling brine. Avoid overcrowding to facilitate heat distribution and ensure even cooking. If using spices or garlic, distribute them evenly within the jars for consistent flavor.
Seal jars with lids securely. Ensure the lid is fitted properly to create a vacuum seal but do not overtighten, as this may hinder the pressure cooking process. Check for any debris on the rim of the jars before sealing to guarantee a tight closure. Proper packing and sealing are essential steps in canning pickles with a pressure cooker.
Setting Up Your Pressure Cooker
Ensure proper sealing before starting. Check the pressure cooker lid for any damage or wear. A tight seal is crucial for maintaining pressure during canning. Always clean the rim of the pot and ensure the gasket is in place. This will prevent any steam from escaping and help achieve optimal results.
Fill the cooker with water. Pour in the appropriate amount of water as specified in your pressure cooker’s manual. Typically, this ranges from 1 to 3 cups, depending on the model. Adequate water is essential for generating steam, which helps maintain the necessary pressure for canning pickles.
Position jars correctly inside. Use a rack or trivet to elevate jars above the water level. This ensures even heat distribution and prevents jars from touching the bottom, reducing the risk of breakage. Proper placement allows for effective pressure cooking and consistent preservation of your pickles.
Adjust the heat source accordingly. Set your stove to medium-high heat until the cooker reaches the desired pressure. Once at pressure, reduce heat to maintain that level. Monitoring the heat closely is vital to prevent over-pressurization, which can compromise the canning process.
Check the pressure gauge frequently. Regularly monitor the pressure to ensure it remains within the recommended range for canning pickles. Sudden fluctuations can affect the quality of the preservation process. Keeping an eye on the gauge allows for timely adjustments to the heat if necessary.
Processing Time and Pressure Levels
Follow precise timing and pressure settings for successful canning. For pickles, the general recommendation is to process jars for 10 to 15 minutes at 10 to 15 PSI, depending on your altitude and the recipe instructions. Always consult specific recipes for exact times, as varying vegetables may require different adjustments.
Monitor the pressure closely during the canning process. Using a pressure regulator, maintain the recommended pressure consistently. Fluctuations can compromise the safety and quality of your canned goods. If the pressure drops, re-establish the pressure and start timing again.
Adjustments may be necessary based on altitude. Higher elevations often require longer processing times to ensure food safety. Consult a reliable source for altitude adjustments to ensure your pickles are preserved correctly.
Safety measures are essential throughout this process. Always use proper canning equipment, including jars that are free of defects and lids that seal correctly. Inspect your pressure cooker for any issues before use to prevent accidents during cooking.
Cooling and Storing Pickles
Cooling your jars properly is essential for ensuring the safety and quality of canned pickles. After processing, remove the jars from the pressure cooker and place them on a clean towel or cooling rack. Allow them to cool at room temperature for at least 12 to 24 hours. This step helps create a vacuum seal, which is crucial for long-term storage.
- Check seals after cooling. Once jars are cooled, press the center of each lid. If it doesn’t pop back, the jar has sealed properly.
- Store in a cool, dark place. Ideal storage locations include pantries or cabinets away from heat sources. Avoid direct sunlight to maintain flavor and quality.
- Label jars with date and contents. Use a waterproof marker or label maker to ensure clarity. This step helps track freshness and rotation.
- Inspect periodically for spoilage. Regularly check stored jars for any signs of spoilage such as bulging lids or leaking contents. Discard if any issues arise.
- Refrigerate opened jars. Once opened, pickles should be refrigerated and consumed within a few weeks for best taste and texture.
Following these steps will maximize the shelf life and flavor of your pickles while ensuring safety in your canning process.
Flavoring Variations for Pickles
Experimenting with different flavors enhances your pickling experience. Infusing your pickles with unique ingredients can transform the taste. Consider incorporating herbs, spices, or even fruits to create distinct profiles. This creative approach not only adds flavor but also personalizes your canned goods.
- Garlic cloves provide a robust flavor. Add whole cloves to your brine for a pungent kick.
- Mustard seeds introduce a subtle tang. Sprinkle them in for a slight crunch and depth.
- Red pepper flakes add heat. Adjust the quantity based on your spice tolerance.
- Coriander seeds offer a citrusy note. Use them for a refreshing twist on traditional pickles.
- Fresh dill can elevate the classic taste. Include sprigs in your jars for that signature dill flavor.
- Apple slices give a hint of sweetness. Pair them with savory ingredients for a balanced profile.
Incorporating these variations into your canning process can lead to delightful surprises. Each batch can be a new experience, allowing you to cater to personal tastes or impress guests with unique flavors. Enjoy the process of discovering your signature pickle recipe!
Quick Summary
- Canning pickles with a pressure cooker is a safe method for preserving low-acid foods.
- Ensure that all equipment, including jars and lids, are sterilized before canning.
- Use a tested recipe to maintain proper acidity levels and prevent spoilage.
- Fill jars leaving appropriate headspace to allow for expansion during pressure cooking.
- Process jars at the correct pressure and time according to the recipe for safe preservation.
- Allow jars to cool and check seals after processing; properly sealed jars can be stored for long periods.
- Label jars with the date and contents for easy identification during storage.
Frequently Asked Questions
Can I use a pressure cooker for canning pickles?
Yes, you can use a pressure cooker for canning pickles, but it is not the most common method. Typically, a water bath canner is recommended for pickles as they are high in acid. If using a pressure cooker, ensure to follow safe canning practices and recipes designed for pressure canning.
What type of pickles can I can using a pressure cooker?
You can can a variety of pickles, including dill, bread and butter, and sweet pickles. It’s important to use recipes specifically designed for canning to ensure acidity levels are safe for preservation. Always follow the recipe’s recommended processing times and methods.
How long do I need to process pickles in a pressure cooker?
The processing time for pickles in a pressure cooker varies depending on the recipe and the size of the jars used. As a general guideline, processing can take anywhere from 5 to 15 minutes at the appropriate pressure. Always refer to a trusted recipe for exact times and settings.
Do I need to adjust the pressure for altitude when canning pickles?
Yes, if you live at a high altitude, you will need to adjust the pressure settings when canning pickles. Higher altitudes require higher pressure to ensure safe processing. Consult a reliable canning guide to determine the correct adjustments based on your elevation.
How can I ensure my pickles are safe to eat after canning?
To ensure your pickles are safe to eat, follow a reliable canning recipe and make sure to process them for the recommended time and pressure. Check that the jar seals properly after cooling and store them in a cool, dark place. Inspect the jars before consuming, discarding any that show signs of spoilage or improper sealing.

- 8 Easy Slow Cooker Beef and Rice Recipes for Delicious Meals - March 29, 2026
- Slow Cooker Beef and Sausage Chili: 7 Steps to Flavorful Success - March 29, 2026
- Savory Beef Back Ribs in a Pressure Cooker: 7 Steps to Perfection - March 29, 2026