Pressure Cooker Apple Butter: Easy Recipe with 7 Key Steps
Apple butter is one of those comforting spreads that transforms a simple slice of toast into a delightful treat. The rich, spiced sweetness of homemade apple butter fills your kitchen with an inviting aroma, making it impossible to resist. Whether enjoyed on warm biscuits or as a filling in pastries, it’s pure bliss!
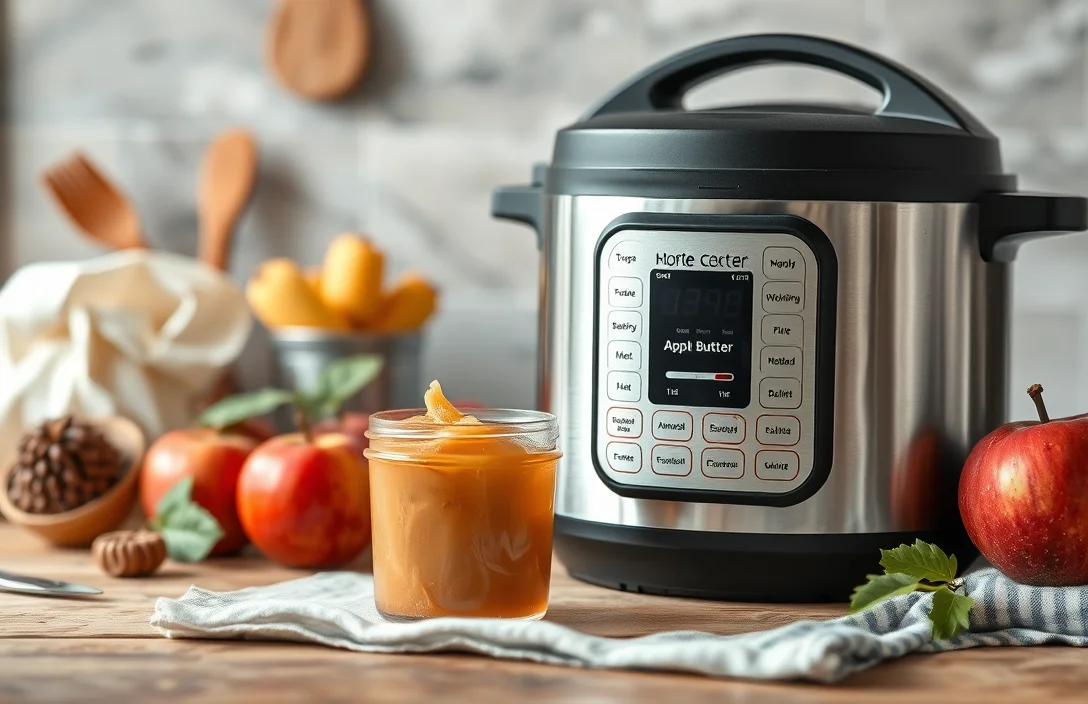
With this pressure cooker apple butter recipe, you’ll achieve the perfect balance of flavors in under 1 hour of cooking time. This recipe is easy and yields about 5 pints of delicious apple butter, making it ideal for gifts or stocking your pantry.
| Prep Time | 15 minutes |
|---|---|
| Cook Time | 30 minutes |
| Total Time | 45 minutes |
| Servings | 5 pints |
| Difficulty | Easy |
Origin of Apple Butter
Apple butter is not just a delicious spread; it’s steeped in history and cultural significance, showcasing the ingenuity of preserving fruit in the past. This section highlights the origins of apple butter and how it has evolved, particularly in the context of modern cooking methods such as using a pressure cooker.
- Historical Background: Apple butter dates back to the early 18th century, primarily in the United States, where settlers sought ways to preserve apples for the winter months. This rich, thick spread was made by cooking down apples with sugar and spices, creating a concentrated flavor that could last for months. The method of slow cooking was labor-intensive, but it allowed families to enjoy the taste of fresh apples long after harvest.
- Cultural Significance: Apple butter holds a special place in various regional traditions, particularly in the Midwestern and Southern United States. It often accompanies traditional dishes and is a staple at harvest festivals. Communities would gather to make apple butter, turning the process into a social event, reinforcing bonds and sharing recipes passed down through generations.
With the advent of the pressure cooker, making apple butter has become more accessible and less time-consuming, allowing home cooks to enjoy this classic spread with a modern twist. This efficient method retains the flavor while significantly reducing cooking time, making it easier to incorporate apple butter into everyday life.
Ingredients for Apple Butter
Making apple butter in a pressure cooker is not only time-efficient but also allows for rich flavors to develop beautifully. Below, I’ve outlined the essential ingredients you’ll need to create a delicious batch of apple butter. Each ingredient plays a crucial role in achieving the perfect balance of sweetness and spice.
| Item | Amount/Specification | Notes |
|---|---|---|
| Apples | 6-8 medium (about 3-4 pounds) | Choose a mix of sweet and tart varieties like Fuji and Granny Smith for depth of flavor. |
| Granulated Sugar | 1 cup (200g) | Adjust based on the sweetness of apples; you can use brown sugar for a richer flavor. |
| Cinnamon | 1 teaspoon | Ground cinnamon enhances the warm flavor profile of the apple butter. |
| Nutmeg | ½ teaspoon | Freshly grated nutmeg is best if available. |
| Allspice | ½ teaspoon | Adds a subtle warmth and complexity. |
| Lemon Juice | 2 tablespoons | Freshly squeezed; helps to balance the sweetness and prevent browning. |
- For a sugar substitute, consider using honey or maple syrup; adjust to taste.
- If you have allergies, ensure your spices are free of cross-contamination.
- Be sure to wash and peel the apples before slicing to maintain texture.
Essential Kitchen Equipment
Before you dive into making delicious apple butter in your pressure cooker, it’s vital to gather the right tools and equipment. Having the proper kitchen gear ensures a smooth cooking process and helps you achieve that perfect flavor and texture. Here’s what you’ll need:
- Pressure Cooker: A 6-quart or larger electric pressure cooker is ideal for making apple butter. This size allows enough room for the apples to cook down and for the mixture to thicken properly. Make sure your pressure cooker has a sealing lid and a way to release steam safely.
- Measuring Tools: Accurate measurements are crucial for achieving the right balance of flavors. You’ll need:
- 1 cup (240ml) measuring cup for liquids
- 1 tablespoon (15ml) measuring spoon for spices and sugar
- 1 teaspoon (5ml) measuring spoon for smaller quantities
Having these tools on hand helps you follow the recipe closely and avoid mistakes.
- Cutting Board and Knife: A sturdy cutting board and a sharp knife are essential for peeling, coring, and chopping your apples. Aim to cut the apples into uniform chunks (about 1-inch pieces) to ensure even cooking. If your knife feels dull, sharpen it before starting to avoid any accidents.
- Wooden Spoon or Spatula: You’ll use this for stirring the apple mixture during cooking. A wooden spoon is gentle on your pressure cooker’s non-stick surface, preventing scratches while providing the strength to mix the thickening apple butter.
- Immersion Blender (optional): If you prefer a smoother apple butter, an immersion blender will help achieve that consistency after the cooking process. Blend the mixture until smooth, being careful of hot splashes.
Gathering these tools will streamline your cooking experience and help you create a delicious batch of apple butter.
Step-by-Step Cooking Instructions
This section provides detailed, timed instructions for preparing your apples and the cooking process for making delicious apple butter in a pressure cooker. Following these steps will help you achieve the perfect consistency and flavor every time.
- Preparing the Apples: Begin by washing 4 pounds of apples (about 8-10 medium apples) thoroughly under cool running water. Peel the apples using a vegetable peeler, then core and slice them into quarters. This will help them cook down evenly. If you’re short on time, you can skip peeling if you prefer a more rustic texture.
- Combine Ingredients: In a large mixing bowl, combine the prepared apples with 1 cup of granulated sugar, 1 teaspoon of ground cinnamon, ½ teaspoon of ground nutmeg, and ¼ teaspoon of ground cloves. Toss the apples and spices together until the apples are well coated. The sugar will start to draw moisture from the apples, which is essential for creating a smooth apple butter.
- Cooking the Apples: Transfer the apple mixture into the pressure cooker. Lock the lid in place and set it to cook on high pressure for 8 minutes. Once the cooking time is complete, allow the pressure to release naturally for 10 minutes before performing a quick release. The apples should be soft and fragrant, with a sweet aroma filling your kitchen.
- Blending the Mixture: After the pressure is fully released, carefully remove the lid. Using an immersion blender, puree the apples until smooth. If you don’t have an immersion blender, you can transfer the mixture in batches to a countertop blender. Be cautious, as the mixture will be hot. Aim for a thick, spreadable consistency.
- Final Cooking: Return the pureed apple mixture to the pressure cooker and set it to sauté mode. Cook for an additional 30-40 minutes, stirring frequently, until the apple butter thickens and darkens in color. The texture should be velvety and spreadable. If it’s too thick, you can add a splash of water to reach your desired consistency.
Pro Tips for Perfect Apple Butter
Making apple butter in a pressure cooker can be a delightful experience, but achieving the ideal texture and flavor requires attention to detail. Here are some pro tips to ensure your apple butter turns out perfectly every time.
Achieving Ideal Texture
- Use the right apple variety: Opt for a mix of sweet and tart apples, such as Fuji, Honeycrisp, and Granny Smith. This combination gives a balanced flavor and helps achieve a smooth texture.
- Ensure proper cooking time: Cook the apples under high pressure for 10-12 minutes. Don’t rush; the apples should be soft and easily mashable. After releasing the pressure, you should be able to mash them with a fork effortlessly.
- Blend for smoothness: After cooking, use an immersion blender to achieve your desired consistency. If you prefer a chunkier apple butter, blend just enough to break down the larger pieces.
Flavor Enhancements
- Spice it up: Add 1 teaspoon of cinnamon, ½ teaspoon of nutmeg, and a pinch of cloves while cooking for warm, aromatic flavors. Adjust these spices to taste based on your preference.
- Sweeten wisely: Start with ½ cup of brown sugar, but feel free to adjust according to your taste and the sweetness of your apples. Taste the mixture before finalizing the sweetness.
- Consider acidity: A tablespoon of lemon juice not only enhances flavor but also helps preserve the apple butter. It adds brightness and balances the sweetness.
Variations and Substitutions
This section dives into exciting variations and substitutions for your apple butter recipe, ensuring it caters to different dietary preferences and flavor profiles. Whether you’re looking for vegan options or unique flavor twists, these tips will help you personalize your apple butter while maintaining its delicious essence.
Vegan Options
| Item | Amount/Specification | Notes |
|---|---|---|
| Sweetener | ¾ cup maple syrup (180ml) | Use instead of brown sugar for a vegan-friendly recipe. |
| Apples | 6-8 medium apples (about 3 lbs/1.4 kg) | Choose any variety; Fuji and Honeycrisp work well for sweetness. |
Flavor Variations
| Item | Amount/Specification | Notes |
|---|---|---|
| Cinnamon | 1 tablespoon (8g) | Add for traditional flavor. |
| Nutmeg | ½ teaspoon (2g) | A pinch adds warmth and depth. |
| Cloves | ¼ teaspoon (1g) | For a spicier profile. |
| Lemon Juice | 1 tablespoon (15ml) | Brightens flavor and balances sweetness. |
- For a tropical twist, consider adding ½ cup of crushed pineapple (120g) during cooking.
- If using sweeter apples, reduce the amount of sweetener to taste.
- For a spiced apple butter, feel free to experiment with ginger or allspice.
Serving and Pairing Suggestions
Apple butter is a deliciously versatile spread that can elevate many dishes. Whether slathered on toast or used as an ingredient in baking, it adds a warm, sweet flavor that pairs beautifully with a variety of foods. Here are some great ways to serve and enjoy your homemade apple butter.
Best Serving Methods
- Spread it generously on warm, buttered toast or bagels.
- Use it as a filling for pancakes or waffles for a sweet breakfast treat.
- Serve it alongside cheese platters, particularly with sharp cheddar or creamy brie.
- Incorporate it into yogurt or oatmeal for an easy and flavorful breakfast.
- Use it as a glaze for meats like pork or chicken, adding a delightful caramelized finish when roasted.
Pairing Ideas
| Food Item | Recommended Pairing |
|---|---|
| Cheese | Sharp Cheddar, Brie, Goat Cheese |
| Breads | Whole Wheat Bread, Croissants, English Muffins |
| Desserts | Ice Cream, Cheesecake, Pound Cake |
| Meats | Pork Chops, Roast Chicken, Turkey |
Chef’s tip: To enhance the flavor of your apple butter, serve it warm. Simply warm it gently on the stovetop or in the microwave for a few seconds.
Experiment with these serving suggestions and find your favorite ways to enjoy apple butter. No matter how you choose to serve it, this rich, spiced spread is sure to be a hit!
Quick Summary
| Prep Time | Cook Time | Total Time | Servings |
|---|---|---|---|
| 15 minutes | 30 minutes | 45 minutes | 4 cups |
- Choose the right apples: Use a mix of sweet and tart apples for depth of flavor.
- Pressure cook: Set pressure cooker to high for 30 minutes for perfect consistency.
- Add spices: Incorporate cinnamon, nutmeg, and cloves for warmth and complexity.
- Blend well: Use an immersion blender after cooking for a smooth texture.
- Cool before storing: Let apple butter cool completely before transferring to jars.
- Tip: Adjust sweetness by adding brown sugar based on apple tartness.
- Tip: For a thicker consistency, cook uncovered for an additional 10 minutes after blending.
Frequently Asked Questions
Can I make this ahead of time? How to store and reheat?
You can definitely make apple butter ahead of time! Store it in an airtight container in the refrigerator for up to 2 weeks or freeze it for up to 6 months, reheating gently on the stovetop or in the microwave.
What can I substitute for sugar?
If you’re looking for a healthier option, you can substitute sugar with honey or maple syrup in a 1:1 ratio, but keep in mind this may alter the final flavor slightly.
How do I know when it’s done?
Your apple butter is done when it has thickened to a spreadable consistency, which usually takes about 20 minutes on high pressure, and it should easily coat the back of a spoon.
Can I freeze this? How long does it last?
Yes, you can freeze apple butter! It lasts up to 6 months in the freezer, just be sure to leave some space in the container for expansion as it freezes.
Why did my apple butter turn out too runny?
If your apple butter is too runny, it may not have cooked long enough; you can return it to the pressure cooker and cook on sauté mode until it reaches the desired thickness. Stir frequently to avoid burning while cooking down the excess liquid.

- Slow Cooker Apple Cider Chicken: 7 Steps to Deliciousness - March 26, 2026
- Make Apple Butter in 7 Easy Steps Using Your Pressure Cooker - March 26, 2026
- Pressure Cooker Apple Butter: Easy Recipe with 7 Key Steps - March 26, 2026